T2 loves boxes. One particular grocery store near us has boxes for people to carry their groceries out in and she often requests we go there to get some. She stands pondering which would be perfect for her project and then once we get home she sets to work, usually only needing help with cutting through the thick cardboard. Today T2 made a home for her new turtle that she got for Easter and she wanted to share what she did to give ideas to other kids : )

Sunday, March 31, 2013
Crafts and activities with boxes
T2 loves boxes. One particular grocery store near us has boxes for people to carry their groceries out in and she often requests we go there to get some. She stands pondering which would be perfect for her project and then once we get home she sets to work, usually only needing help with cutting through the thick cardboard. Today T2 made a home for her new turtle that she got for Easter and she wanted to share what she did to give ideas to other kids : )
Monday, March 25, 2013
Tuesday, March 19, 2013
Diver in a bottle
Today we did a fun experiment which demonstrates how applying external pressure to a container it increases the density of the object within it causing it to sink.
First we filled an empty plastic pop bottle (small) with water almost to the top. We dropped paper clips into the bottle. Next we taped a small magnet to a Styrofoam packing 'peanut' and screwed the lid back on the bottle.
We wanted to make the 'diver' go down to the bottom and retrieve the paperclips. How would we do this? By squeezing the bottle and holding it squeezed this increases the pressure and forces the diver down to the bottom. When you release the bottle the diver returns to the surface bringing with it paperclips attached to the magnet.
Here G demonstrates quite theatrically for us!
Monday, March 18, 2013
Monday science-fest
I spent some time on the weekend while I was fighting some cooties and feeling achey and lethargic scouring our science books to plan what science we would do this week. Two books I really love are
I gathered supplies - lots of them

The first one we tried was 'Ice Cloud' from Science Rocks. We haven't observed the results yet so I'll wait and add that one tomorrow.
Our next one was from the same book called 'liquid layers' . We poured water dyed with food colouring, oil and molasses into a glass and dropped in small objects of varying weights, gave it a good stir to mix the liquids and set it aside for the suggested 30 minutes. Tick tock, tick tock. Thirty minutes later our liquids were still mixed and had not separated by density as they should have. The oil had separated but the molasses and water still seemed a bit confused and it was hard to see if all the objects were on the bottom or somewhere in the darkness of the water/molasses mixture. We got on with our next experiments and then the day got busy and we haven't looked at them again but will tomorrow.

'Crystal Creations' also from Science rocks was next. We filled jars with hot water, almost to the top and added 1 tablespoon of powdered alum to each jar and stirred. Next we each took a paper clip and pulled it open to form a kind of S shape. Using cut up pipe cleaners we made snow flakes by twisting the pieces around one another. Then we hooked one end of the paperclip over a pencil and hooked the other end onto our snow flakes. By resting the pencil across the top of the jar the snowflake was able to be suspended without touching the sides (this will spoil the results) and allowed it to be submerged in the water. Tomorrow we should see crystals formed on the pipe cleaners, if only diamonds were so easy and fast to create!!! The alum we had is from I don't even know what maybe a play dough recipe or something from forever ago - I'm not sure if its age will affect the outcome.

Our final experiment was to discover how dense objects are (once again from Science Rocks). the concept was a little over T2's head but she enjoyed it all the same. T1 fully understood it.
First we needed a 2 litre plastic pop bottle. I had asked G when he went to the store to buy any kind of pop as long as it was 2ltr. It was some awful cheap stuff that we poured away after a quick taste to confirm that it was nasty stuff! The bottle was perfect - it's cheapness made it easier to work with than I think a popular brand of pop would come in.
We had to cut the top half of the bottle off and we tossed that in the recycling. Then we made a hole (the bottle was flimsy enough that I used a paper hole punch) maybe an inch from the top of that section. Then we secured half a drinking straw in that hole with modelling clay to seal the hole (actually we used that tacky stuff to stick posters to walls because thats all we had. It worked fine).
Next we needed some household objects that were small enough to fit in the bottle half. We chose rocks, toys, kitchen supplies.
Next you need to fill the bottle half with water, with a container under the straw. Keep filling until water flows through the straw, then stop. Wait until the water stops flowing and dump that on a plant or somewhere. put the container back beneath the straw. (you need to do this between each object to make sure the water level is corrected).
Next weigh an object. We used a post office scale because thats what we had and it's good for light items.

We noted the weight on a piece of paper. Next we carefully dropped the item in the water. The item displaced the water which over flowed through the straw into the empty container. Our straw should have been angled slightly more downward but it wouldn't seal well and this was the best we could manage without any leaks.

When it stopped flowing we poured the over flow water into a measuring device more suited to small quantities. Then we noted the volume of displaced water.
To find the density of an object all you need to do is divide the mass (previously noted weight) by the volume (the displaced water just measured).
I cut the video off before we calculated the actual density by mistake - oops!
A lesson for Mom
Soooo we are on a bit of a science kick right now and I see so many experiments in books and online that I want to do them all!
On Pinterest I saw a colour mixing experiment that I knew we had to do. I gathered the materials and we set to work. I only looked at the picture and figured it was easy enough. I did not read the instructions - MISTAKE! I saw the finished result and without thinking I put water in all three of the glasses for each colour mix, added one primary colour of food colouring to each of the outside glasses (correct) and used strips of paper towel to connect the outer glasses with the centre one - correct. We watched in anticipation as the paper towel absorbed the coloured water and crept up the paper towel where it eventually met the clear water that had travelled up from the central glass. The colour stopped travelling. I didn't see what was so obvious. After some times had passed, we ditched the paper towel strips replacing them with coffee filter strips. Same thing happened (of course), then I replaced the coffee filter strips with tissue strips and yes of course the same thing happened. I was getting kind of miffed then it dawned on me and I felt so silly. I dumped the water from the central glass of each set and replaced the tissue with fresh paper towel strips and within a very short time the experiment worked. The paper towel absorbed the coloured water and transferred it to the empty glass where upon the 2 primary colours mixed and we cheered!!
Here's one of our pretty but failed attempts.....

and sometime later our successful experiment in absorption and colour mixing


Our orange didn't come out great because we ran out of yellow food colouring but it was definitely a red-orange

The purple was awesome but my lighting wasn't!


This is my favourite picture because it was actually working!!!!!

Lesson learned - I will read instructions next time!!!
Sunday Science Steve Spangler style
I had seen a Steve Spangler video a while ago of an experiment I wanted to try. I think it was this video...
Then I stumbled upon the experiment via Pinterest on an awesome blog called Ordinary Life Magic.
On Sunday after dinner we gave it a go. All you need to do are grab some tea bags and cut the top off, empty the tea, stand the empty bag on a plate, light it and watch to see convection currents at work. Just in case keep some water close by for safety.
It was so much fun!
Mommy brag
T2 started ice skating in December. She had been a couple of times last season but didn't enjoy it at all. Our local homeschool group has a skating session once a week in our town which costs $5 per family per season (Oct-March) which is an amazing deal. When we first went T2 was falling down every two seconds and kind of running clip clip clop. We decided not to sign her up for lessons because she didn't seem to want them and also the homeschool skate is very quiet and everyone is really respectful of the little ones and beginners. I don't skate so she needed to feel comfortable going on by herself with her friends. I knew the bigger kids would help her if needed - they rock! Anyway fast forward a few weeks and she is doing so great and loves it! I am so proud of her enthusiasm and perseverance. Here she is (white coat, bright pink pants)
Sunday, March 10, 2013
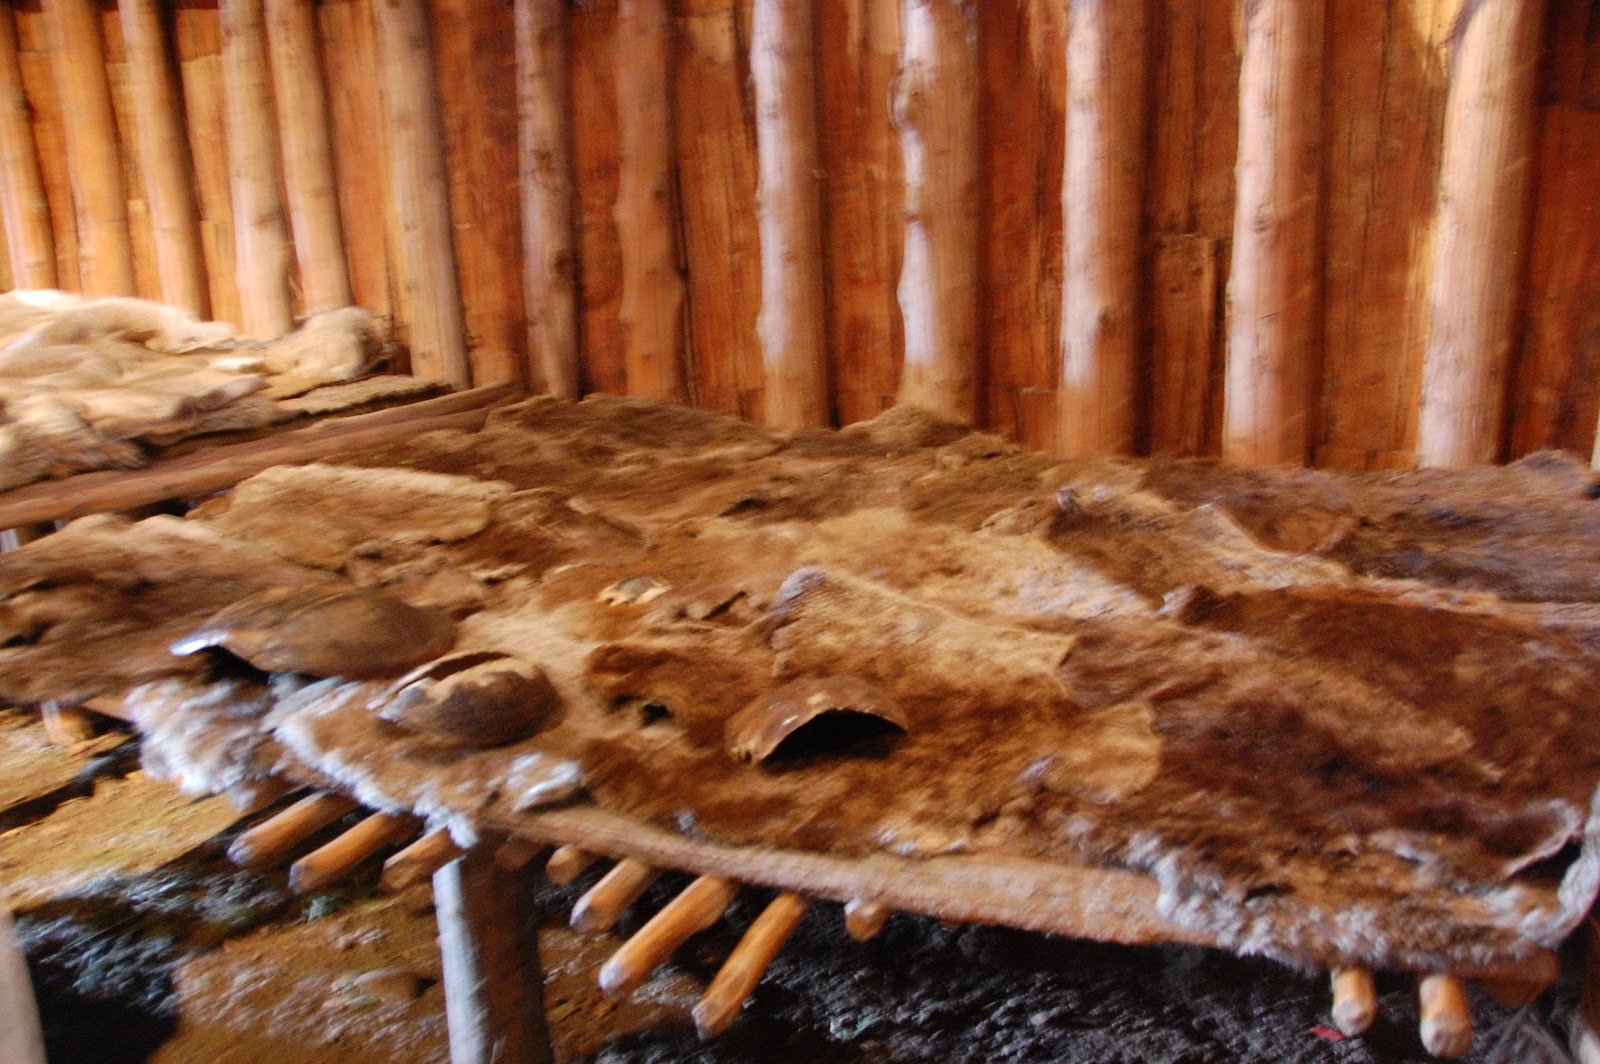
Pioneers part 2
We enjoyed our trip to Crawford Lake, some corn grinding and exploring the long houses and their contents.


Saturday, March 9, 2013
Pioneers
 T2 and I have been spending a lot of time lately studying Pioneers. T1 remembers studying this when he was in public school and I am glad that he has retained some of what he learned several years ago. We have been enjoying Laura Ingalls Wilder's books and are currently over halfway through The Little House on The Priarie having completed The Little House in the Big Woods. Despite being an avid reader my entire life, I never actually read this series of books but I did enjoy the TV show. T2 has never seen the show although we did watch part of the pilot last week, just up to the point that we were in the book at that time. It was interesting to compare the book and show and notice things that were different or different than we had imagines. We tried making butter which was a success. We made a covered wagon model and wrote using ink and real feathers. It just happens that two of T2's homeschooling friends are also reading the books so we are able to chat about them when we get together.
Tomorrow we're heading to a place that has a Pioneer long house set up showing just how many families lived here many years ago. The last time we were there not only were the children little but Hudson was still a sweet smelling tiny minimally shedding puppy! I mentioned our visit here. I'll take pictures of the long house and add them when we get home tomorrow. It is expected to be a mild day which we are excited about!
Friday, March 8, 2013
Hovercraft experiment continued
Last night we ran out of time to work on our hovercraft but tonight we tried two different modifications. The first was to attach 4 small balloons to the bottom of the disc - we used tape to secure them as that part would not be touching the water.

We tried one last thing. We cut out a piece of styrofoam from some packaging we had, using the disc as a template and used a cookie cutter to cut a hole in the middle...

Yayyy success!!!
A little science on Friday
After a busy morning at our local homeschool co-op and a much needed lunch, we did a couple simple experiments. The first wasn't overly successful but it was one I had been meaning to do for a while.
Place some milk on a plate and drop food colouring onto the milk. Then add a drop of dish soap. I realized afterwards that some people recommend dabbing the soap on with a Q-tip and we didn't, we used an empty syringe and maybe that was too much soap but here are our results....
The results we were hoping for were more like this
The other experiment we did was a variation on the baking soda and vinegar volcano that most people are familiar with. We have done that many times and enjoyed it but it's over so fast even if you repeat it a few times. I saw somewhere the idea (when I find the source that inspired me I'll add the link) of spreading baking soda on a plate or tray, mixing food colouring with vinegar and dropping the vinegar onto the baking soda to cause mini eruptions and it was way more fun.....
Thursday, March 7, 2013
Hovercraft fail!
Last night we decided to try the hovercraft in the bath. It didn't work too well!! The challenge is to make it successful before bath time tonight....
Wednesday, March 6, 2013
Can crushing experiment
A few minutes ago we tried a can crushing experiment that I had heard about but never seen done before. I was rather intrigued to say the least.
All you need to do it cover the bottom of a container with ice cubes and then add cold water. Take an empty pop can and put a small amount of water in it and heat it on the stove until you see steam. For us the water was boiling away for ages but we couldn't see steam and the can was turning brown so we decided to give it a try at that point anyway. We hoped it would work because we only had one empty pop can. Using tongs or an oven mitt pick up the VERY HOT can and quickly turn it upside down and submerge the top of the can in the icy water. Don't blink or you will miss it!!
Next time I'll remember to tidy the kitchen first!!
Critter watching
We have a community of voles on our property. They have discovered the fallen birdseed from our feeders and are frequent visitors to the feathered friends dining area. On a recent mild day T2 and I stretched out on our front porch to observe them. They were only about 18 inches away and we were able to hear them as well see their tiny features. They will destroy our lawn and plants but rather than trap or poison them we will have to learn to share the property and try to get along the same way we already do with the moles and rabbits.


Hovercraft experiment
Last night we decided to try making a hovercraft. All you need are a balloon, a CD/DVD disc that you no longer need, the pop up lid of either a water bottle or dish soap bottle and some strong glue. Glue the lid in the centre of the disc. I used hot glue which worked perfectly and dries fast. Blow up a balloon and attach it to the closed lid. Be sure to attach the entire neck right to where the balloon becomes round - all the while keeping the air in the balloon (I twisted the 'neck' a few times). When the balloon is fully in place, pop the lid into the open position and see what happens. We had some successes and some failures as you can see...
Balloon was way too small
Balloon wasn't attached well enough
Balloon still not attached well enough
Not enough surface area
Still not enough surface area
Just right : )
Tonight we will try it in the bath and see what happens.
Tuesday, March 5, 2013
A couple of quick experiments
We have been having fun with science- here are a couple of our recent experiments.
This was inspired by Jean at The Artful Parent
We had so much fun with this experiment. Fill a jar/bottle 3/4 with vegetable oil, add water until it almost reaches the top, drop in a few drops of food colouring and then add Alka Seltzer and enjoy!! We also added glitter later that day for fun. When it stops bubbling you can simply add more Alka Seltzer to activate it again.
Subscribe to:
Posts (Atom)